Sunday, June 16, 2013

A Picnic in the Park

When I think about a picnic in the park, I imagine a checkered tablecloth, a basket filled with fresh bread, amazing cheeses, cured meats and killer wine.  Let's face it, these picnics never work out the way you see them in the movies, for me anyway.  Truth be told, your loved one may not be pleased with any of this, despite the most romantic setting. "Really?" As they look at you saying, "Where are the ribs? Fried chicken? Hamburgers?" I've prepared food for numerous picnics over the years, everything from a concert on the green, to a hill overlooking a serene pond, to the woods overlooking a babbling stream, to the rocks on the coast of Maine, to the beach, and you know what? Each and every one included very different food and not as much of a success as I had originally planned it to be.

After years of experimenting, I think I've finally found some picnic-worthy salads that are suitable for any venue and any palette.  Not just for picnics, these are also perfect for tailgating or your friend's backyard barbecue.  I've made all these recently for a friend's post wedding backyard picnic celebration and I thought I'd share them with you.

My sisters have been making this salad for years, but I've kicked it up a notch by adding diced apple and chopped cashews.  Served on split croissants or snowflake rolls, they are perfect for any picnic, lunch or brunch.  Be sure to keep it cool until ready to serve, as it has mayonnaise in it.
Tarragon Chicken Salad

Tarragon Chicken Salad
2 C diced or shredded cooked chicken
1 Granny Smith apple, diced
1/3 C diced celery
3/4 C mayonnaise
1 T lemon juice
2 T freshly chopped Tarragon
1/4 t salt
1/4 t pepper
1/3 C lightly salted, roasted chopped cashews

Mix all together and keep refrigerated until ready to use


Everyone loves this salad- it's colorful, healthy and very zen-like.  Add diced, cooked chicken and it's practically a meal in itself.  I recommend preparing this at least a few hours in advance in order for the flavors to blend.  Keep cool until about an hour before serving.
Wild Rice Salad

Wild Rice Salad
4 C cooked wild rice 
1/2 C dried cranberries ( I use one pkg. of Craisins)
1 T sherry vinegar + a splash of good balsamic vinegar
1 T fresh lemon juice
1 t  Dijon mustard
1/3 C olive oil
1/4 C sliced scallions (white part)
1/4 C chopped celery
1/2 C coarsely chopped pecans, lightly toasted
salt and pepper to taste

Cook rice according to package directions and let cool.  Whisk together vinegars, lemon juice, mustard, scallions and oil. Season with salt and pepper.  Add remaining ingredients to the rice and mix in the dressing. 


And for the meat lovers, this BBQ sauce is TOPS!  I've made various sauces, but none as easy or as versatile or as tasty as this one.  Use it on chicken, pork or beef.  Believe me, this will quickly become your new favorite! BBQ the meat ahead of time and pack left overs for the picnic.  Or, for another salad idea, make the Tai Chicken Salad- my Go To salad for concerts on the Green!
Barbecued Chicken

Simple Barbecue Sauce
1 (24 oz) bottle ketchup
1 C cider vinegar
1/2 C molasses
2 T Worcestershire sauce
1 C water
1 T paprika
1 T onion powder
1 T mustard powder
1 t garlic powder
1/2 t ground black pepper
14 t cayenne pepper

Combine all ingredients in a medium saucepan. Bring to a boil and reduce heat to medium and simmer until sauce is thickened and reduced by one third, about 30 min. Let cool to room temperature before using. Store in refrigerator up to 2 weeks.

Tai Chicken Salad
Tai Chicken Salad
Shredded mixed salad greens (I prefer Romaine)
4 C cubed barbecued chicken
1 C bean sprouts
1 large red pepper
1 seedless cucumber, cut into strips
1/2 C dry roasted peanuts
6 T fresh lime juice
1/4 C brown sugar
1 pkg. garlic ginger wonton strips (produce dept.)
1 jalapeno pepper
1/2 t nutmeg
1 T minced fresh ginger
1/4 C minced fresh mint
3 T minced fresh basil

Combine first 6 ingredients for salad.  Mix remaining ingredients (for dressing) in a bowl and whisk or place into a jar and shake until well blended.  

Monday, March 25, 2013

Fun and Creative Easter Treats

Bird's nest in my front door

Easter is by far my favorite holiday- taking a very close second to Thanksgiving, of course.  I absolutely love Springtime because it is time to renew and refresh your life, your home and your soul.  Everything comes alive again: the flowers, grass and beautiful blooming trees.  And for me, nothing beats the smell of a warm, sunny spring day!  Easter comes early for us this year, and with that (hopefully) Spring.  The House Finches outside tell me that Spring is just around the corner as they sing joyfully while guarding five little bird eggs nestled inside the wreath on my front door.

Easter Flower Vase
I love hosting Easter because the food and tablescapes are as joyful as the House Finch’s singing.  Although I will not be hosting the holiday for my family this year, I will be bringing these treats in honor of Easter.  These are fun and easy to make, and the kids will have fun helping you! I hope these ideas give you inspiration to make your Easter holiday a special one for your family.

Deviled Egg Chicks
Deviled Eggs
12 large eggs
½  C. mayonnaise
2 t. mustard
¼ c. finely chopped sweet pickles
¼ c. finely chopped celery
Capers or black olives and a carrot for garnish

Prepare hardboiled eggs. Crack open and carefully cut in half.  Scoop out the yolk and mix with first 5 ingredients.  Pipe into half of the egg white and top with the other half. Garnish with capers or black olives for the eyes and a carrot slice for the beak. 

Robin's Egg Nest Treats


Robin's Egg Nest Treats
3 T. butter
4 C. miniature marshmallows
6 C. Kellogg’s Rice Krispies Cereal
Shredded coconut
Jelly beans

Melt butter in large saucepan over low heat.  Add marshmallows and stir until completely melted.  Remove from heat and add cereal- stir well until coated.  Using buttered spatula or wax paper, evenly press mixture into muffin tin(s), making an indent in the center of each.  Cool and remove from pan.  Garnish with shredded coconut tinted with green food color and jelly beans.

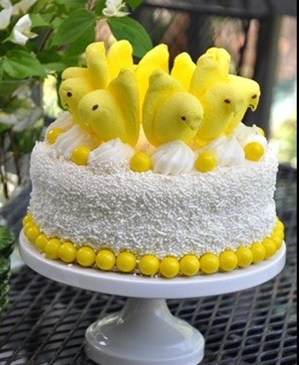
Peeps Cake
This photo speaks for itself.  I opted for a chocolate cake and decorated it with yellow Peeps and gum balls.  You could use any cake flavor or Peep color or a variety of colors, depending on your desired result. White frosting with white sprinkles provides additional texture.  I used a 6 inch cake pan, but a regular 8 inch pan will do. The pedestal cake plate is the perfect final touch. I can't wait to see the look on my niece and nephew's face when they see this!


Thursday, February 28, 2013

My Heart, My Sauce

When I first started writing this blog, my husband told me that I could write about anything and post all the recipes I want, except for my spaghetti sauce. Coming from someone who isn’t even Italian and only knew Ragu from a jar, I found the comment particularly funny.  Truth be told, it would actually be very difficult to put it in recipe form.  The fact is, you have to learn by watching, like I did from my mother and my grandmother.  My sauce was good, very good actually, however I knew that something was missing.  Therefore I spent the past 10 years “perfecting” my sauce by gleaning tips and tricks from others which I am happy to share with you.  Shhhh….. don’t tell my husband.
 
I’ve shared a handful of recipes that are very near and dear to my heart, but none so much as my spaghetti sauce.  Sharing these tips with you is like giving you a piece of my heart. This post is a photographic documentary for my daughter, Alyssa, who is all grown up and on her own and misses “Mom’s Sauce”.

Tomatoes in the Food Mill
I start the sauce with fresh plumb tomatoes from my garden and supplement them with canned, peeled tomatoes because I’ve found that using all fresh garden tomatoes yields a thicker, sweeter sauce.  The ratio I use is half fresh and half canned tomatoes, but you might want to alter the this depending on your particular taste.  The same goes for the seasonings that you use to flavor the sauce.  Put the blanched, fresh and canned tomatoes through a food mill (or la machina, as my grandmother referred to it) to strip away the skin and seeds which tends to make the sauce bitter. This is by far, the messiest part, but well worth the effort in the end.


Perfectly Formed Meatballs
I usually prepare the meat prior to starting the sauce because I like the meat to flavor the sauce as it cooks. Typically, I put meatballs, Italian sausage and a slab of pork ribs.  The key to the perfect meatball is day old Italian bread in lieu of bread crumbs.  Coarsely ground and soaked in milk makes the perfectly textured meatball- remember to squeeze out the extra milk from the crumbs.  Add to meatball ingredients and use an ice cream scoop to form the meatballs in the same size and shape.
Saute Tomato Paste in Drippings
Saute the sausage in olive oil in a skilled until browned on all sides.  Remove from pan, add meatballs and brown in sausage drippings.  Add one small can tomato paste to the drippings in the pan and hit it with a splash of red wine.  Stir until the pan is deglazed and reserve to add to the sauce.

Start the sauce with chopped, fresh garlic (not that stuff in a jar!) in the bottom of a large pot with olive oil and a little water, which keeps the garlic from burning. Then add a whole, peeled onion with two whole cloves inserted into it.  For years, I used chopped onions, but unless you are constantly tending to the sauce by stirring it, they burn on the bottom of the pot. This method provides the flavor without the burning and the hint of clove is a nice juxtaposition to the acid in the sauce.  Add tomato paste mixture and browned meat (pork goes in raw and is cooked in the sauce).
Instead of using parsley, I use chopped celery leaves (thanks Beth!). The celery leaves provide a much smoother taste and helps to cut the acid in the sauce.  Add the chopped basil leaves toward the end to give it a fresh taste.

Sauce Simmering in a Pot
For me, making Sunday Sauce just isn’t complete without listening to Frank Sinatra or sound tracks from the Godfather, Goodfellas or the Bronx Tale.  Simmer sauce until it coats the back of a wooden spoon- turn off heat and let rest. Serve over hot pasta cooked in heavily salted water (1 large handful). Don’t forget the antipasto, fresh bread, freshly grated parmesan cheese and Italian red wine.  Buena Festa, bella fina!

Sunday, January 13, 2013

Make Mine a Mini

I've decided to start out 2013 in a much smaller way- smaller priorities, smaller to-do lists, smaller expectations (ha!) and smaller portions.  I don't know how long I'll make it with the first three (that's a post all its own, and not for this blog), but smaller portions I can do.  Inspired by a recent article in the Wall Street Journal with the title same as this post (nod to Ruth Millward who brought it to my attention), I've since been contemplating that (sometimes) just a taste is enough.  Smaller plates and smaller cocktails provide the opportunity to sample a number of different things without over doing it. 

Calorie savings aside, minis are really en vogue right now.  I was at an event recently at On20 in downtown Hartford in honor of all the Top Work Places in Connecticut (kudos to my employer, Standard Builders, for making the grade for the past 6 years!) and everything served were minis: from appetizers to desserts, there was an array of minis everywhere- except for the bar. Hmmmmm..... Anyway, one of my favorites that immediately stood out was the frozen S'mores on a spoon.  The top of each one was browned by hand with a mini torch.  I had to have three to properly evaluate them.  All I can say is OMG.... Yuuuuuummmm City! 

All these minis and the newspaper article got me to think how we could adapt everyday food into something more elegant, that provides just a taste, especially if you don't want to totally abandon your New Year's resolution.  Here are some ideas that I came up with.  Feel free to adapt and use to punctuate your next gathering or to celebrate Super Bowl, Daytona 500 (I'll be there!), Valentine's Day, etc.  The key is to have fun and be creative!

Mini Pizzas
Preheat oven to 450 degrees.Coat inside cups of two muffin pans with non-stick cooking spray. Divide raw pizza dough into 12 equal pieces, form into balls and shape into 4" rounds around the inside of coated muffin cups. Invert second pan over shaped dough. Bake dough cups for 10 min., remove top pan and bake 10 min. more.  Remove from oven and fill with 1 T. sauce, 3 T. mozzarella and 1 t. of your preferred toppings.  Return to oven and bake until golden, about 8 - 10 min.  Cool in pan for 10 min. before serving.

Mini Pizzas
Be creative, there are lots of options and varieties to choose from.  Make it fun for the family by setting up a topping bar.  Don't forget to freeze leftovers- I'll bet you'll never go back to pizza rolls for after school snacks!


Mini Quiches
Preheat oven to 350 degrees. Use 3" round cookie cutters to cut out refrigerated pie crust dough and line mini muffin tins.  Fill with quiche filling of your choice and bake 15 - 20 min. until golden.  I like to make these ahead and freeze because they can be reheated later, and they're so much better than those frozen, prepared pigs in a blanket! Mini quiches are always an elegant classic for any occasion.


Mini Mac 'n Cheese Cups
2 c. uncooked elbow macaroni
1 T. butter
1 egg, beaten
1 c. milk
1 1/2 c. shredded cheddar cheese
1 1/2 c. shredded mozzarella cheese
1/2 c. seasoned dry bread crumbs
2 t. olive oil
1/2 t. salt

Mini Mac 'n Cheese Cups
Preheat oven to 350 degrees. Spray muffun tins with cooking spray.  Mix together bread crumbs, olive oil and salt- set aside.  Cook macaroni for only about 8 min. so that they are still a bit firm.  Drain.  Stir in butter and egg until coated. Stir in all but remaining ingredients except for 1/2 c. cheddar.  Spoon into prepared tins. Top with reserved cheese and bread crumbs. Bake for 30 min. until golden brown.  Allow to cool for 5 min. so that cheese sets and they hold their shape.


Mini Pies
Mini Pies
Preheat oven to 375 degrees.  Similar to the quiches, line regular size muffin tins with prepared, refrigerated pie crust, making sure to leave extra dough to crimp top crust.  Fill with pie filling of your choice (apple, blueberry, cherry) add top crust and crimp edges.  Brush with 1 egg mixed with 2 T water and dust with vanilla sugar for a special effect.  Make a variety and arrange on a pretty plate so that there is something for everyone.  I have no idea if Table Talk makes pies anymore, but these will have them beat, hands down!  Those mini pie makers make the process much faster and easier.


Mini Cupcakes and Cake Balls
Cupcakes are becoming more and more popular, so why not make minis so that you can try more than one kind?  Great idea for a baby or bridal shower or your child's next birthday party.  Mix it up with a variety of cake flavors, frosting, toppings and decorations.  P.S. how about Cake Balls?  Like the mini pie makers, there are cake ball makers everywhere.  Use a toothpick to dip into granache frosting and let set.  Or if you want an even more decadent version, mix half prepared cake mix with half prepared frosting before cooking.  Dip into white or chocolate granache and decorate when set.


Mini Cakes
Mini Chocolate Tortes
If you look around, you can find miniature spring form pans.  Last Valentine's Day, I made miniature heart-shaped Chocolate Tortes (see Feb. 2011 post: In Love with Chocolate) garnished with confectioners' sugar and raspberries.  Drizzle chocolate and/or raspberry sauce for a cute and romantic dessert.  Since you have mini spring form pans, why not make miniature cheesecakes? 


Mini Sundaes and Parfaits
Vintage ice cream sundae dishes and parfait glasses are perfect vessels for mini desserts.  Similar to the pizza topping bar, create a topping bar for ice cream sundaes.  Parfaits are coming back and are lighter now than ever.  Why not experiment with some of them?  Think of using ingredients like crushed shortbread or gingersnap cookies and lightening up puddings with whipped cream.  Don't forget to include fruit like cooked apples and carmel and fun garnishes like carmelized nuts and mini chocolate chips.

Shooters Anyone?
Bloody Mary Shooters
I attended a vodka dinner at Max's about a year ago and all that was served with the beverages were small bites called Zakuski.  I was very impressed with all of them, particularly the mini potato pancakes with salmon and dill hollandaise and Borscht Shots with braised short rib and celeriac foam.  Just how cool is that?!! It was absolutely fantastic.  No, the vodka was not Absout, but rather Russian Standard, dispensed from a beautiful, pillared and uplit ice sculpture.  Since we're on the subject of vodka...You could also put a similar twist on Bloody Mary shooters and garnish with oysters, cooked shrimp, celery, olives, bacon, lemon... put extra in a small pitcher.


Mini Cocktails
Ok, so back to my impetus for this post: the Wall Street Journal article.  Why not serve up your favorite martini or cocktail in a vintage glass?  Ever notice how much smaller they were back in the day?  Just watch one of those old classic black and white movies- those cocktail glasses were amazing.  Antique shops and eBay are excellent resources for these.  I ordered a martini last week and it was so big that I couldn't finish it.  And as the aforementioned article stated: ever have the last two sips (nod to my brother-in-law Ted here) of a martini?  Uggggghhhhh!! Serving in smaller glasses and keeping the rest of the martini in a chilled shaker is a much better option in my opinion.  While on the subject of mini cocktails, have you seen Chili's new Mini Margarita Trio? Very cool indeed..... I'm already thinking Cinco de Mayo!


Saturday, December 8, 2012

My Gift to You this Holiday Season: a Signature Cocktail


When hosting a party, nothing says ‘you’re special’ like a signature cocktail.  I always try to include a little something extra in addition to the mainstream beer and wine at my gatherings.  Whether it’s the classic retro cocktails of the 60’s at my Mad Men Premier, or Martha Stewart’s homemade eggnog at my annual Holiday Cookie Swap, I try to  include something special that guests will remember long after the party is over. 

This ‘tradition’ began about 5 years ago when I started bringing a signature cocktail to our family’s Christmas celebration.  Each year, I’d surprise them with a special cocktail, made just for them.  It could be as simple as freezing a bottle of good vodka in an empty milk container filled with water and holly berries, or as elaborate as Twisted Christmas which includes a half dozen different liquors.  Hot Buttered Rum dates back as far as George Washington's time and is perfect for larger gatherings because the batter can be made in quantity ahead of time. I have fond memories of these Christmas celebrations: my father guarding the vintage punch bowl of homemade eggnog keeping cold on a table outside on my back deck (one for the guest, and one for him :), my late father-in-law enjoying more than his share of Twisted Christmas shakes at what would have been his last Christmas with us, and me and my sisters drinking iced vodka as we contemplated the best way to present the appetizers.  This year’s signature holiday cocktail is yet to be determined, although I’m thinking something sparkling might be in order…. 

The following  are some of my favorites in honor of the 2nd Anniversary of my blog- enjoy them this holiday season, and let us raise our glasses to Peace, Health and Prosperity.  Best wishes to you and yours this holiday and into the New Year!

Hot Buttered Rum
Hot Buttered Rum
1 lb. light brown sugar
1/2 lb. softened butter
2 t. cinnamon
2 t. ground nutmeg
1/2 t. allspice
2 t. vanilla

In mixing bowl, beat together butter and remaining ingredients until well combined.  Refrigerate in reusable container for up to a month, or place in freezer until ready to use.  In a preheated coffee mug, combine 2 heaping tablespoons batter with 1 1/2 oz. rum. Top with boiling water and stir to mix.

Gingerbread Martini
1 1/2 oz. vanilla vodka
1 1/2 oz. Frangelico
1 T. butterscotch schnapps
4 oz. ginger beer
Dark rum

Mix first three ingredients in shaker with ice.  Strain into glass.  Add ginger beer and a splash of dark rum.

Gingerbread Martini
Eggnog
6 eggs, separated
3/4 c. sugar
2 c. heavy cream
2 c. milk
2 c. bourbon
2 T. rum
freshly grated nutmeg

Beat egg yolks with mixer.  Gradually add 1/2 c. sugar until light and fluffy.  Beat egg whites separately until stiff peaks form, gradually adding remaining sugar.  Gently fold whites into yolk mixture.  Stir in cream and milk.  Add bourbon and rum, stir until combined. Chill, tightly covered for at least 3 hours. Stir gently before transferring to punch bowl.  Dust with freshly grated nutmeg before serving.

Twisted Christmas
Twisted Christmas

softball size vanilla ice cream
2 oz. Grand Marnier
2 oz. Creme de cocoa (white)
1 oz. Galliano
1 oz. brandy
1 oz. whiskey
eggnog

Add ice cream and 4 oz. eggnog in blender.  Add liquors and blend until frothy.


Tuesday, November 20, 2012

Thankful for the Ability to Provide Inspiration


This Thanksgiving season, I am thankful for inspiring others through my food blog, cooking class and radio interview.  Until recently, I didn’t realize how much what I’ve been doing as a creative outlet has inspired others.  I am truly grateful for my readers and those who continue to inspire me- and for that, I say “Thank You.”
Meg Bailey, Janet Pierce, Denise Egan, Nicole Carbone & Vin Robinson

After a year of contemplating teaching a cooking class, I finally did it.  My inspiration was all around me and at the prompting of some of the young women who work with me in my real job, I held a cooking class in my kitchen earlier this month.  With the holiday season rapidly approaching and little time to plan and prepare, I demonstrated how easy it was to prepare a simple, yet elegant meal.  Modeled around the concept of this blog, I developed an easy, seasonal menu that could be prepared within an hour.

Drizzling honey on the Baked Brie
Six women from Standard Builders learned techniques for using fresh herbs, chopping garlic and rolling out pie dough while they participated in an interactive class where all had a hand in preparing the meal.  What started out as an informal cooking class, ended up turning into a true team building exercise.  Donned in vintage aprons, my colleagues were excited about the event and interested in being inspired and learning a few time saving tips.

The perfect quick Apple Pie
We started out with the quickest and easiest Holiday Baked Brie so that the women had a little something to nibble on with the wine during class. Then we made an Apple Pie which baked while dinner was being prepared.  Coring and slicing apples takes the most time, but with a kitchen full of helpers, it took next to no time at all.  I typically make my own pie crust, but for this purpose, I used refrigerated pie down and demonstrated the quickest way to make an amazing pie.  My grandmother’s tip of using a pastry cloth was the key here, as it made the dough easy to handle and resulted in a lot less mess!  Even the more ‘experienced students’ thought this time saving tip was well worth the minimal price of admission.  

While the pie was baking, we prepared a one pot meal of Hoisin Chicken with Cranberry Rice (big nod to Ming Tsi’s One Pot Meals!).  One pot meals are great because they require minimal ingredients and preparation time, and result in the least mess.  As the chicken was simmering, we cut fresh herbs from the garden for the Roasted Butternut Squash.  I grow butternut squash in my own garden, but peeling and seeding them is time consuming.  If time is worth money to you, I suggest you get the squash already peeled and cut in the grocery store.  Once the squash is almost completely cooked, sprinkle with freshly chopped herbs which then become very aromatic and finish the dish.  The last thing we prepared was a Classic Caesar Salad.  The key is in layering the flavors- tossing with olive oil and seasoning with salt and pepper and repeating the process along with fresh lemon gives it a really fresh taste.  Homemade croutons are best, but you can find good ones in the produce section of the grocery store.

The finished meal, complete with Pinot Noir
The end result was a deliciously hot meal that not only looked good, but appealed to everyone.  In fact, Janet said that she now has her menu for Christmas Eve dinner!  

A few days after the class, I was interviewed on internet radio about my blog and the cooking class.  You can listen to the Nov. 7th airing here: http://www.blogtalkradio.com/grandmassecrets/2012/11/08/food-for-thought#.UJml4pZv3Po.gmail.  (My segment is 30 minutes into the show).

Special thanks to my class participants for giving me the desire and confidence to continue providing inspiration to you and others to discover and embrace the cook within yourselves.

Holiday Baked Brie
1 wheel of Brie Cheese
1/2 c. chopped walnuts
1/2 c. Craisins
Honey

Place brie in a microwave safe dish, top with fruit and nuts. Drizzle with honey and heat in the microwave approx. 30 - 45 seconds until slightly melted.


Traditional Apple Pie
6 c. peeled, cored and sliced apples
1 T. lemon juice
2 T. flour
3/4 c. sugar
2 1/2 t. apple pie spice
1 T. butter
Refrigerated Pillsbury Pie Crust
1 egg slightly beaten with 2 T. water

In large bowl, mix apples, lemon juice and dry ingredients. Roll out pie crust on lightly floured surface. Line pie plate with dough and add apple mixture. Dot with butter.  Add top crust and crimp.  Bake at 350 degrees for 45 min.  Brush with egg wash and sprinkle with sugar. Bake an additional 10 - 15 min.


Roasted Butternut Squash
Butternut squash, peeled, seeded and cubed
Olive oil
Salt and pepper
chopped fresh herbs, optional

Saute squash in frying pan with oil to coat vegetables lightly. Roast on all sides, stirring occasionally.  Sprinkle with fresh herbs and season with salt and pepper when vegetables are 3/4 cooked.


Classic Caesar Salad
Romaine lettuce, chopped
3 cloves garlic, halved
1 egg, partially cooked
Olive oil
1/2 c. parmesan cheese
1 lemon
Worcestershire sauce
Croutons
salt and pepper

Season bowl (preferably wooden) with garlic halves.  Add chopped romaine and drizzle with oil.  Season with salt and pepper.  Toss.  Add lemon juice, egg and a few dashes of worcestershire.  Drizzle with more olive oil and season again.  Add cheese and croutons.


Monday, October 22, 2012

Soul Food


Everyone has a soul and everyone eats food, yet everyone feeds their souls with food differently.  This was the topic of a discussion I had recently with Omena (www.omena777.blogspot.com), friend of mine and Soul Historian.  Omena brought some very insightful observations to my dinner table which I share with you.

Relating food to love, the people express their love in one of two ways: conditionally and unconditionally.  It is conditional if you feel that you have to cook in order to keep people together.  Conditional cooks tend to use safe colors that are monochromatic and bland. However, it doesn’t matter what you cook, because all will end up having indigestion. 
Conversely, you can make soup from stones if you are cooking for the right reasons, loving without abandonment with gratitude in a nurturing way.  Unconditional cooks use a variety of everything in bright colors and spices.  However, for those that are searching, nothing ever seems good enough. (Wow- that just hit a little close to home!)

Probably the most obvious was that those who tend to overindulge are avoiding something or searching because they can never seem to get enough, while those that deprive themselves are incapable of receiving (love).

So, let’s say you/re the cook for a hypothetical feast.  Who would you invite? The manipulative mother, the eccentric aunt, the critical brother-in-law, the non-confrontational sister, the fun loving friend?  As much as people’s characteristics are different, so are their taste buds.  What do you serve with such an eclectic  group? 

Recipe for the Soulful Cook
Start with flexibility
And a sense of humor
Open your heart
Add a big dose of love
And en even bigger dose of tolerance
Discard the OCD
Sprinkle with random stardust (spices)
And serve with a smile.

What I’ve learned is that if you put energy into your cooking and do with love, you will walk out of the kitchen looking like you never did anything.  P.S. here’s another point to ponder:  What would the slogan be on your apron?  I thought about it for a minute and determined that mine would say: Kiss the Cook :)