Showing posts with label Creative and Fun. Show all posts

Sunday, February 25, 2018

Happy Birthday to Me

Happy Birthday to Me!
Usually, I am the one who plans and organizes social events, but this time it was my husband Bruce.  Originally planned to be a different dinner altogether, this event turned into an expanded Valentines and birthday celebration with an intimate group of friends. In this case, Bruce was expanding the guest list, not me.  On this snowy night, twelve of us sat down for a very memorable celebratory dinner that I thoroughly enjoyed preparing.  

IT'S ALL ABOUT THE DETAILS 
Heart Shaped Ice Cubes at the Bar
There was one overarching theme that resonated throughout the night:  Hearts.  From the prosecco to the decoration to the ice cubes in the bucket on the bar and the individual flourless chocolate cakes. The table was set perfectly with my grandmother's china, silverware and varying styles of champagne glasses and white linen napkins.  Candles adorned the length of the table to set an intimate atmosphere and the fabulous music of Chris Botti played in the background.  
Prosecco Toast


THE MENU WAS PERFECTION  No dinner party would be complete without the appropriate cocktails and wine to accompany a fantastic meal.  Prosecco was flowing- everyone received a glass upon entering our house.  I have a collection of various champagne glasses and like to use them whenever I can.  Having different styles helps to up the festive atmosphere. For those who preferred high end liquor, it was served over a large sphere, slow melting ice cube.  Pinot Noir accompanied the meal perfectly and Muscat dessert wine was served along with other cordials with the chocolate desserts.  My birthday cake was custom made by the chef at Pine Orchard Yacht Club and took two days to make.  Comprised of chocolate mousse and dark chocolate wafer layers, it was served with an amazing raspberry sauce.  The other desserts included flourless chocolate cakes and homemade chocolate truffles. 
Dinner Plate
I created the menu based on all my favorite foods- afterall, it was my birthday, so why not? P.S. The French Onion Soup is Julia Child's recipe- by far the best I've ever had!  The entire menu included:


Stuffed Mushrooms
Chicken Pate

French Onion Soup

Grilled Lamb Chops with a Cherry Bourbon Sauce
Smashed Potatoes (refer to 03.14 blog post for recipe)
Asparagus wrapped in Prosciutto with a Balsamic Glaze

Individual Flourless Chocolate Cakes (refer to 02.11 blog post for recipe)
Chocolate Truffles
Lamb Chops Marinating 

Grilled Lamb Chops
Bone in Lamb Chops topped with
Olive Oil
Chopped Garlic
Fresh Chopped Rosemary
Salt and Pepper

Grill over hot coals 5 minutes each side.  Let rest and serve.

Cherry Bourbon Sauce
1/4 c. brown sugar
1/2 c. cider vinegar
Boil 10 min.  Hold aside and add at end.
In separate saucepan:
8 oz. halved cherries
2 T. butter
2 T. sugar
Cook 3 min. and add:
1 1/2 c. chicken stock
1/2 c. bourbon
1 T. molasses
1 T. maple syrup
Salt & Pepper to taste
Add sugar vinegar syrup.

French Onion Soup
French Onion Soup

6 c. sliced onions
3 T. butter
1 T. oil
1/2 t. sugar
Cook in large pot until browned then add 2 T. flour.  Cook briefly then add:
5 qts. beef stock (best if made from scratch!)
2 c. white wine
Simmer 30 minutes.
Line bottom of crock with toasted french bread.  Top with swiss cheese.  Pour soup over top then add a splash of cognac. Top with more another slice of bread, grated swiss cheese and a sprinkle of parmesan.  Cook in 450 degree oven for 20 minutes.

Tuesday, July 18, 2017

Dessert as Easy as 1, 2, 3

Chocolate Puff right out of the oven
Have you ever been in a twist over what to make for dessert when you have unexpected company? Ever have to bring dessert to dinner at a friend's house?  How about just needing something quick and simple, yet elegant and satisfying? I have the answer for you.


3 Simple Ingredients
It's a Chocolate Puff.  Yes, I know it sounds more complicated than it really is, but believe me, it's quick and simple.  The only thing simpler would be ice cream sundaes. Really- trust me on this.  This has become my new go to dessert, and everyone LOVES it! All you need is three simple ingredients.  Keep them on hand and you will never be at a loss for a quick and elegant dessert again.

Chocolate Puff

1 package frozen puff pastry, thawed
Step 1
1 large chocolate bar of your choice (I prefer Special Dark)
Slivered almonds, large handful


Unfold pastry on a cutting board. 
Place chocolate bar in the center of the center panel.

Step 2

Make vertical cuts at each of the four corners of the candy bar to the edge of the pastry.


Make about 5 (45 degree angle) cuts on either side of the bar.
Fold ends over the chocolate bar.  Fold angled strips alternately across front of the candy bar as if you were making a braid.
Step 3


Carefully place pastry on parchment lined baking sheet. 
Brush with egg wash and sprinkle with slivered almonds. Bake at 425 degrees for approx. 15 - 20 minutes until puffed and golden.

Saturday, May 13, 2017

Are You Waffling?

Stove top Waffle Iron
Like most people do from time to time, I've been vacillating about making a career move recently.  I guess you could say that I'm waffling about some of my options. But since this blog is about food and not my career in design and construction, let's talk about another type of waffling.  

I have a stove top Belgium waffle iron that has been under utilized for years.  I take it out rarely to make waffles for an occasional Sunday brunch.  So I decided to use it for some favorite foods.  Mostly because it seemed like a much more healthy alternative than frying.  And the geometric shape of a waffle is unexpected and fun.  There's something about waffle geometry and the transformative power of the waffle iron that turns (almost) any recipe into an adventure.  


The stove top waffle iron was patented by Dutch American inventor Cornelius Swathout on August 24, 1869 and its anniversary is celebrated as National Waffle Day.   The Belgium Waffle was brought to the US at the New York World's Fair in 1964 by Brussels restauranteur Maurice Vermersch based on the recipe that his wife developed during World War II.  I remember the first time I had a Belgium waffle with ice cream and stawberries- it was at the Big E in the mid 70's.  I thought it was AMAZING.  You will find that the following Belgium waffle recipe is just as amazing because it is light and airy on the inside and has a slight crunch on the outside.  Mother's Day is tomorrow, and if you are planning on making breakfast or brunch, you might want to consider this classic favorite.

Waffled hash browns with poached egg

So, I've fallen in love with my waffle iron all over again recently and discovered that it can be used for any number of foods.  One of my favorites is hash browns! If you don't have time to make them from scratch, you can use tater tots- they work just as well.  Serve with a poached egg on top and you have a real breakfast winner.  I've also discovered that you can waffle the following:


Waffled Dumplings
Crab Cakes
Banana Bread
Dumplings / Pierogies / Ravioli
Chicken Fingers
Rice
Mac & Cheese
Portobello Mushrooms
Hamburgers
French Toast
Grilled Cheese 
BLT's
Quesadillas

What are you waffling about? Get creative, be adventurous, and surprise your family with something unexpected and fun!


Classic Belgium Waffles
Belgium Waffles with Strawberries and Syrup


4 eggs, separated

1/4 c. sugar
1 t. salt
6 T. butter, melted
2 c. flour
2 t. baking powder
1 1/3 c. milk

Beat egg whites until stiff; set aside.  In mixing bowl, combine dry ingredients.  In a separate bowl, beat milk, egg yolks and butter and add to dry ingredients.  Beat until batter is smooth. Fold in egg whites. Bake in waffle iron until golden and crisp, about 4 minutes.


Sunday, March 13, 2016

My Kitchen Update

Newly updated kitchen
It all started because my basement refrigerator died. Realizing that it would be best to just relocate our kitchen refrigerator downstairs, was the start of our kitchen update.  I say update because we didn't do any major renovations, just an update of the appliances, counter tops, furniture, paint, lighting and window treatments. Believe me, it felt more than that, but in the end it was all worth it.  

Kitchen before the update
Our home is only about 20 years old and the existing kitchen echoed it. White appliances scream 90's, so that's where we began.  Honestly, I never thought I'd get so excited about kitchen appliances, but I did.  The hardest part was finding a refrigerator that served our purposes and fit within the existing space.  One thing I did not want to do was cut into the existing, beautiful cabinetry.
New refrigerator
Luckily we found one from Fisher & Paykel which worked perfectly.  I didn't really care about the dishwasher as long as it was
quiet, but the stove I did.  I love the new stove which is automated yet very easy to use and clean. We also added under cabinet lighting and an extra light over the sink to enhance the lighting in the kitchen, and believe me- what a difference ambient lighting makes!  I put in a new, large and deep stainless steel (chef) sink with a trendy bronze faucet to complete the appliances.

Perimeter counter top design
The counter tops were more difficult to decide on.
We used elements of the earth and the ocean as our inspiration. However when it was all installed, particularly on the island where I do all the prep for my cooking, there seemed to be too much movement in the pattern. Ultimately, what we decided to do was re-purpose the island counter in the adjacent laundry room and put a more solid counter top to 'anchor' the kitchen. The black counter top is not a solid, it does have a pattern which resembles a summer starry night. Working in the design and construction industry for 25 years and married to an architect, you'd think I'd get the concept of form follows function..... my bad.  As for the shape, we
Re-purposed counter in laundry
added depth in order to create an overhang which matched the eyebrow style of the cornice over the sink window. Since everything in the kitchen was square, it was nice to add some curves and rounded edges, similar to the small stand and new, Pottery Barn kitchen table and counter stools.
 Also had complimentary back splash tile installed which tied a tight bow around the L-shaped counter to add dimension where all the 'light' was.  We opted for more subtle colors to blend in seamlessly with the new color palette.


Galley view- note new stove and tile
The existing muted eggplant wall color was changed to more of a green-putty color to compliment the kitchen elements rather than fight with them.  I made the purple work for 7 years by complimenting it with sage green, but now it was time to move on to a more sophisticated palette.  I also removed the outdated appliance garage and replaced the stain glass insert in the cabinet door above it to blend more seamlessly with the new design.

New granite bar top
Ok, now on to scope creep. Happens in all the projects I've been involved in professionally, the same happened with my kitchen. Since we were having work done, we figured that we'd tear out the laminate counter on the built-in bar in the adjacent den and put in a nice granite top. All I can say is WOW!  And then, since our 8 ft. slider was rotting from the outside, we had the slider and trim replaced and stained to match the cabinets.  Lastly was the window treatments and the rugs.  

The take-away from my kitchen update: Hire designers and contractors that really listen to you. I hired Laurene McGarry-Bissell of Eclectic Design, Inc. in Glastonbury, CT www.ecticdesigninc.com and she says:

New kitchen table
Custom window treatment
"If the cabinets are in good shape, there is no need to replace them for a fully effective renovation.  Replacing counter tops, backslashes, increasing lighting, trendy faucets and cabinet hardware and a fresh coat of wall paint can make the cabinets look brand new. Benefit of hiring a designer for a full or partial kitchen renovation:  (1) saves you time — a professional can find materials that suit your style, budget and that will mix well with the rest of your decor; (2) the smaller details really make a difference — an ogee edge versus a pencil edge, what color faucet would you prefer — stainless steel versus antique bronze; (3) under cabinet lighting — does the designer and contractor understand the various types of under cabinet lighting and types of lighting that can give you what you need without breaking the budget; (4) can manage the entire process to ensure a smooth project, especially if the designer has a  contractor he/she likes to work with.  They are a seasoned team that communicates well and respect one another’s roles so that your project is completed to your complete satisfaction."

Monday, January 4, 2016

10th Annual Holiday Party- Baking it Forward

Thanks to all for Baking it Forward!
I am still feeling so fulfilled as I write this after having delivered trays of homemade holiday cookies to those in need and the first responders in Shelton (where my office is located) on Christmas week.  It is so gratifying to bring something so unexpected, yet greatly appreciated, to those who really deserve it- For me, that's what the holidays are all about.

What started out 10 years ago as a way to save my sanity during the holidays, turned into an event that grew exponentially with each year.  Hosting a Cookie Swap saved me from the 48 hour cookie baking blitz hangover for sure, and I was very pleasantly surprised by all the wonderful and delectable holiday cookies that my friends and family proudly brought to the party. 
Beautifully Packaged Cookies
 
Year #2 grew to include the guys and even more snacks and holiday drinks, but this time, we added a Yankee Re-Gift Swap to mix things up.  We've come to find out that there were always one or two gifts that were most desired as they served as a big source of amusement, and the game became a little cut-throat (in a friendly sort of way).   

In Year #5, one or two of the gifts managed to reappear under our tree.  The guest list grew and so did the small plates and libations.  We always provide beer and wine, but sometimes include a signature cocktail such as a specialty martini, mimosa or homemade eggnog. This was the year that we started to include a prize for 'Best Cookie' which kept everyone on their best cookie baking game.

Year #6: It seemed unfulfilling that all of us enjoyed the event so much while there were others that were not so blessed with a home, family and friends, presents under the tree and food in their bellies.  So that year, we started donating a tray of cookies to a charity of our choice.  These donated trays were always welcomed and it made all of us feel the spirit of the season even more intensely.


Holiday Appetizers
Year #10, the largest attendance included 32 people, probably because it didn't snow on the day of the event!  The food was amazing- everyone contributed small plates which included pulled pork sliders, stuffed breads, spaghetti and meatball muffins, cocktail meatballs and turkey and stuffing eggrolls. And for dessert, brownie cake and homemade eggnog. And the cookies were just amazing.  We had so much that 6 trays were donated to charity.

You can see how my modest holiday party / cookie swap
Herbed Goat Cheese Pinecones
has grown over the years.  It gives me so much pleasure to host this signature event as a way to gather friends and to say thanks- Because when I really think about it.... for me, it's all about friendship, appreciation and generosity.  My sincere thank you to all who have contributed over the years to this event.  I will be writing a cookbook commemorating the 10th Annual Holiday Party, and will include a compilation of cookie recipes, savory snacks and hosting tips.  Meantime, I share some of the highlights of our holiday party with you.  Best wishes for a happy holiday season and a happy, healthy and prosperous New Year!


Cocktail Meatballs (at every event for the past 10 years)
1 lb hamburger
1 egg
1/3 c breadcrumbs
2 T A-1 Steak Sauce

Combine all ingredients and shape into small meatballs.  Brown under broiler in a cookie sheet lined with foil.  Drain fat and add to large frying pan along with:  1 c A-! steak sauce, 4 T brown sugar and 6 T butter.  Simmer, covered for 15 minutes and serve warm.

Sausalito Crab Dip 
1 pkg. Knorr Leek Soup Mix
1.5 c sour cream
1 T lemon juice
1/2 t hot pepper sauce
2 cans lump crab meat, drained
1 can artichoke hearts, drained and chopped
1 c shredded Swiss cheese
1 T chopped fresh dill

Mix all ingredients together and chill for 2 hours.  I like to hollow out a round pumpernickel bread and fill with dip.  Garnish with cherry tomatoes and fresh rosemary to simulate holly.

Turkey and Stuffing Eggrolls
Left over chopped turkey meat
Left over stuffing
Left over mashed potatoes\
Eggroll wrappers

Combine first three ingredients and place a large tablespoon of mixture in bottom corner of eggroll wrapper.  Brush opposite corner with a little water and roll up from the bottom, fold in sides and seal with top.  Fry in shallow pan with canola oil and serve with hot gravy and / or cranberry sauce.

Brownie Cake

Brownie Cake
1 stick butter
4 eggs
1 lb. can Hershey's Syrup
1 c sugar
1 c flour
1 t baking powder
1 t vanilla
1 c chopped walnuts or chocolate chips (optional)

Mix all ingredients together and pour into a prepared tube pan.  Bake at 350 degrees for 45 minutes.  Cool, unmold and sprinkle with powdered sugar or chocolate glaze.

Monday, March 25, 2013

Fun and Creative Easter Treats

Bird's nest in my front door

Easter is by far my favorite holiday- taking a very close second to Thanksgiving, of course.  I absolutely love Springtime because it is time to renew and refresh your life, your home and your soul.  Everything comes alive again: the flowers, grass and beautiful blooming trees.  And for me, nothing beats the smell of a warm, sunny spring day!  Easter comes early for us this year, and with that (hopefully) Spring.  The House Finches outside tell me that Spring is just around the corner as they sing joyfully while guarding five little bird eggs nestled inside the wreath on my front door.

Easter Flower Vase
I love hosting Easter because the food and tablescapes are as joyful as the House Finch’s singing.  Although I will not be hosting the holiday for my family this year, I will be bringing these treats in honor of Easter.  These are fun and easy to make, and the kids will have fun helping you! I hope these ideas give you inspiration to make your Easter holiday a special one for your family.

Deviled Egg Chicks
Deviled Eggs
12 large eggs
½  C. mayonnaise
2 t. mustard
¼ c. finely chopped sweet pickles
¼ c. finely chopped celery
Capers or black olives and a carrot for garnish

Prepare hardboiled eggs. Crack open and carefully cut in half.  Scoop out the yolk and mix with first 5 ingredients.  Pipe into half of the egg white and top with the other half. Garnish with capers or black olives for the eyes and a carrot slice for the beak. 

Robin's Egg Nest Treats


Robin's Egg Nest Treats
3 T. butter
4 C. miniature marshmallows
6 C. Kellogg’s Rice Krispies Cereal
Shredded coconut
Jelly beans

Melt butter in large saucepan over low heat.  Add marshmallows and stir until completely melted.  Remove from heat and add cereal- stir well until coated.  Using buttered spatula or wax paper, evenly press mixture into muffin tin(s), making an indent in the center of each.  Cool and remove from pan.  Garnish with shredded coconut tinted with green food color and jelly beans.

Peeps Cake
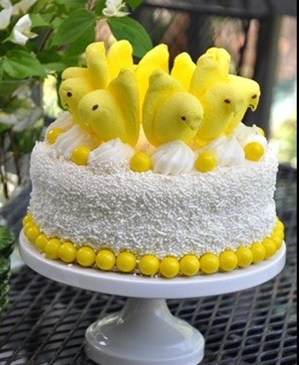
This photo speaks for itself.  I opted for a chocolate cake and decorated it with yellow Peeps and gum balls.  You could use any cake flavor or Peep color or a variety of colors, depending on your desired result. White frosting with white sprinkles provides additional texture.  I used a 6 inch cake pan, but a regular 8 inch pan will do. The pedestal cake plate is the perfect final touch. I can't wait to see the look on my niece and nephew's face when they see this!


Sunday, January 13, 2013

Make Mine a Mini

I've decided to start out 2013 in a much smaller way- smaller priorities, smaller to-do lists, smaller expectations (ha!) and smaller portions.  I don't know how long I'll make it with the first three (that's a post all its own, and not for this blog), but smaller portions I can do.  Inspired by a recent article in the Wall Street Journal with the title same as this post (nod to Ruth Millward who brought it to my attention), I've since been contemplating that (sometimes) just a taste is enough.  Smaller plates and smaller cocktails provide the opportunity to sample a number of different things without over doing it. 

Calorie savings aside, minis are really en vogue right now.  I was at an event recently at On20 in downtown Hartford in honor of all the Top Work Places in Connecticut (kudos to my employer, Standard Builders, for making the grade for the past 6 years!) and everything served were minis: from appetizers to desserts, there was an array of minis everywhere- except for the bar. Hmmmmm..... Anyway, one of my favorites that immediately stood out was the frozen S'mores on a spoon.  The top of each one was browned by hand with a mini torch.  I had to have three to properly evaluate them.  All I can say is OMG.... Yuuuuuummmm City! 

All these minis and the newspaper article got me to think how we could adapt everyday food into something more elegant, that provides just a taste, especially if you don't want to totally abandon your New Year's resolution.  Here are some ideas that I came up with.  Feel free to adapt and use to punctuate your next gathering or to celebrate Super Bowl, Daytona 500 (I'll be there!), Valentine's Day, etc.  The key is to have fun and be creative!

Mini Pizzas
Preheat oven to 450 degrees.Coat inside cups of two muffin pans with non-stick cooking spray. Divide raw pizza dough into 12 equal pieces, form into balls and shape into 4" rounds around the inside of coated muffin cups. Invert second pan over shaped dough. Bake dough cups for 10 min., remove top pan and bake 10 min. more.  Remove from oven and fill with 1 T. sauce, 3 T. mozzarella and 1 t. of your preferred toppings.  Return to oven and bake until golden, about 8 - 10 min.  Cool in pan for 10 min. before serving.

Mini Pizzas
Be creative, there are lots of options and varieties to choose from.  Make it fun for the family by setting up a topping bar.  Don't forget to freeze leftovers- I'll bet you'll never go back to pizza rolls for after school snacks!


Mini Quiches
Preheat oven to 350 degrees. Use 3" round cookie cutters to cut out refrigerated pie crust dough and line mini muffin tins.  Fill with quiche filling of your choice and bake 15 - 20 min. until golden.  I like to make these ahead and freeze because they can be reheated later, and they're so much better than those frozen, prepared pigs in a blanket! Mini quiches are always an elegant classic for any occasion.


Mini Mac 'n Cheese Cups
2 c. uncooked elbow macaroni
1 T. butter
1 egg, beaten
1 c. milk
1 1/2 c. shredded cheddar cheese
1 1/2 c. shredded mozzarella cheese
1/2 c. seasoned dry bread crumbs
2 t. olive oil
1/2 t. salt

Mini Mac 'n Cheese Cups
Preheat oven to 350 degrees. Spray muffun tins with cooking spray.  Mix together bread crumbs, olive oil and salt- set aside.  Cook macaroni for only about 8 min. so that they are still a bit firm.  Drain.  Stir in butter and egg until coated. Stir in all but remaining ingredients except for 1/2 c. cheddar.  Spoon into prepared tins. Top with reserved cheese and bread crumbs. Bake for 30 min. until golden brown.  Allow to cool for 5 min. so that cheese sets and they hold their shape.


Mini Pies
Mini Pies
Preheat oven to 375 degrees.  Similar to the quiches, line regular size muffin tins with prepared, refrigerated pie crust, making sure to leave extra dough to crimp top crust.  Fill with pie filling of your choice (apple, blueberry, cherry) add top crust and crimp edges.  Brush with 1 egg mixed with 2 T water and dust with vanilla sugar for a special effect.  Make a variety and arrange on a pretty plate so that there is something for everyone.  I have no idea if Table Talk makes pies anymore, but these will have them beat, hands down!  Those mini pie makers make the process much faster and easier.


Mini Cupcakes and Cake Balls
Cupcakes are becoming more and more popular, so why not make minis so that you can try more than one kind?  Great idea for a baby or bridal shower or your child's next birthday party.  Mix it up with a variety of cake flavors, frosting, toppings and decorations.  P.S. how about Cake Balls?  Like the mini pie makers, there are cake ball makers everywhere.  Use a toothpick to dip into granache frosting and let set.  Or if you want an even more decadent version, mix half prepared cake mix with half prepared frosting before cooking.  Dip into white or chocolate granache and decorate when set.


Mini Cakes
Mini Chocolate Tortes
If you look around, you can find miniature spring form pans.  Last Valentine's Day, I made miniature heart-shaped Chocolate Tortes (see Feb. 2011 post: In Love with Chocolate) garnished with confectioners' sugar and raspberries.  Drizzle chocolate and/or raspberry sauce for a cute and romantic dessert.  Since you have mini spring form pans, why not make miniature cheesecakes? 


Mini Sundaes and Parfaits
Vintage ice cream sundae dishes and parfait glasses are perfect vessels for mini desserts.  Similar to the pizza topping bar, create a topping bar for ice cream sundaes.  Parfaits are coming back and are lighter now than ever.  Why not experiment with some of them?  Think of using ingredients like crushed shortbread or gingersnap cookies and lightening up puddings with whipped cream.  Don't forget to include fruit like cooked apples and carmel and fun garnishes like carmelized nuts and mini chocolate chips.

Shooters Anyone?
Bloody Mary Shooters
I attended a vodka dinner at Max's about a year ago and all that was served with the beverages were small bites called Zakuski.  I was very impressed with all of them, particularly the mini potato pancakes with salmon and dill hollandaise and Borscht Shots with braised short rib and celeriac foam.  Just how cool is that?!! It was absolutely fantastic.  No, the vodka was not Absout, but rather Russian Standard, dispensed from a beautiful, pillared and uplit ice sculpture.  Since we're on the subject of vodka...You could also put a similar twist on Bloody Mary shooters and garnish with oysters, cooked shrimp, celery, olives, bacon, lemon... put extra in a small pitcher.


Mini Cocktails
Ok, so back to my impetus for this post: the Wall Street Journal article.  Why not serve up your favorite martini or cocktail in a vintage glass?  Ever notice how much smaller they were back in the day?  Just watch one of those old classic black and white movies- those cocktail glasses were amazing.  Antique shops and eBay are excellent resources for these.  I ordered a martini last week and it was so big that I couldn't finish it.  And as the aforementioned article stated: ever have the last two sips (nod to my brother-in-law Ted here) of a martini?  Uggggghhhhh!! Serving in smaller glasses and keeping the rest of the martini in a chilled shaker is a much better option in my opinion.  While on the subject of mini cocktails, have you seen Chili's new Mini Margarita Trio? Very cool indeed..... I'm already thinking Cinco de Mayo!


Saturday, December 8, 2012

My Gift to You this Holiday Season: a Signature Cocktail


When hosting a party, nothing says ‘you’re special’ like a signature cocktail.  I always try to include a little something extra in addition to the mainstream beer and wine at my gatherings.  Whether it’s the classic retro cocktails of the 60’s at my Mad Men Premier, or Martha Stewart’s homemade eggnog at my annual Holiday Cookie Swap, I try to  include something special that guests will remember long after the party is over. 

This ‘tradition’ began about 5 years ago when I started bringing a signature cocktail to our family’s Christmas celebration.  Each year, I’d surprise them with a special cocktail, made just for them.  It could be as simple as freezing a bottle of good vodka in an empty milk container filled with water and holly berries, or as elaborate as Twisted Christmas which includes a half dozen different liquors.  Hot Buttered Rum dates back as far as George Washington's time and is perfect for larger gatherings because the batter can be made in quantity ahead of time. I have fond memories of these Christmas celebrations: my father guarding the vintage punch bowl of homemade eggnog keeping cold on a table outside on my back deck (one for the guest, and one for him :), my late father-in-law enjoying more than his share of Twisted Christmas shakes at what would have been his last Christmas with us, and me and my sisters drinking iced vodka as we contemplated the best way to present the appetizers.  This year’s signature holiday cocktail is yet to be determined, although I’m thinking something sparkling might be in order…. 

The following  are some of my favorites in honor of the 2nd Anniversary of my blog- enjoy them this holiday season, and let us raise our glasses to Peace, Health and Prosperity.  Best wishes to you and yours this holiday and into the New Year!

Hot Buttered Rum
Hot Buttered Rum
1 lb. light brown sugar
1/2 lb. softened butter
2 t. cinnamon
2 t. ground nutmeg
1/2 t. allspice
2 t. vanilla

In mixing bowl, beat together butter and remaining ingredients until well combined.  Refrigerate in reusable container for up to a month, or place in freezer until ready to use.  In a preheated coffee mug, combine 2 heaping tablespoons batter with 1 1/2 oz. rum. Top with boiling water and stir to mix.

Gingerbread Martini
1 1/2 oz. vanilla vodka
1 1/2 oz. Frangelico
1 T. butterscotch schnapps
4 oz. ginger beer
Dark rum

Mix first three ingredients in shaker with ice.  Strain into glass.  Add ginger beer and a splash of dark rum.

Gingerbread Martini
Eggnog
6 eggs, separated
3/4 c. sugar
2 c. heavy cream
2 c. milk
2 c. bourbon
2 T. rum
freshly grated nutmeg

Beat egg yolks with mixer.  Gradually add 1/2 c. sugar until light and fluffy.  Beat egg whites separately until stiff peaks form, gradually adding remaining sugar.  Gently fold whites into yolk mixture.  Stir in cream and milk.  Add bourbon and rum, stir until combined. Chill, tightly covered for at least 3 hours. Stir gently before transferring to punch bowl.  Dust with freshly grated nutmeg before serving.

Twisted Christmas
Twisted Christmas

softball size vanilla ice cream
2 oz. Grand Marnier
2 oz. Creme de cocoa (white)
1 oz. Galliano
1 oz. brandy
1 oz. whiskey
eggnog

Add ice cream and 4 oz. eggnog in blender.  Add liquors and blend until frothy.


Thursday, April 21, 2011

Egg-Cited About Easter

Easter has to be my favorite holiday.  Time to renew and refresh your life, your home and your soul.  Everything comes alive again- the flowers, grass and beautiful blooming trees. As with many nationalities, my ancestors live on thru me in various traditions, particularly at Easter time.  My gift for you this season is a couple traditions that have been passed along to me, which I continue to cherish each year with my family and friends.  I hope that you enjoy them as much as my father appreciates the fact that I carry on these traditions within our family. Please note: you will need half of a day for the breads, but they are well worth the time and patience to make them!  P.S. use left over Easter eggs for egg salad or interesting deviled eggs.  For the best hard boiled eggs ever: http://www.marthastewart.com/257079/perfect-hard-boiled-eggs

Grandma's Pastia (Rice Pie)

3/4 c. River Rice, raw and rinsed
1 1/4 c milk
2 T. butter
1 c. sugar
5 eggs
1 1/4 c. whole milk ricotta
2 t. grated orange rind
1 t. grated lemon rind
1 t. cinnamon
1/2 c. raisins or candied fruit, optional

Butter bottom and sides of 2 qt. glass casserole dish.  Dust with cracker meal or unflavored bread crumbs.  In large saucepan combine rice, milk, and bring to a boil over med. heat, stirring constantly, 20 min.  Remove from heat and add butter and sugar.  Boil again for 5 min.

In large bowl, combine eggs, ricotta, seasoning, and fruit.  Ladel a small amount of the mixture into egg mixture to heat eggs gradually.  Pour egg mixture into saucepan containing the rice mixture and whisk.  Pour mixture into prepared casserole.  Bake at 350 degrees for 45 minutes.  Note: you can also pour mixture into prepared pie crust.

Aunt Josie's Italian Easter Breads

2 pkg. yeast
1 c. warm water
1 c. sugar
1 t. salt
1/2 c. butter, melted
1 c. milk, warmed
6 c. sifted flour
3 eggs beaten
1 T. anise extract
6 hard cooked eggs, colored

Soften yeast in water- add a pinch of sugar to proof. Measure sugar and salt into large bowl.  Stir in butter and milk until sugar dissolves. Beat in 2 c. flour until smooth and add anise extract. Blend in yeast and eggs.  Stir flour to make soft dough and turn onto lightly floured surface.  Knead until satiny- about 15 min.  Shape into large ball and put into large greased bowl, turning to cover all sides.  Cover and let rise in warm place until doubled, about 3 hours. 

Punch down and let rest 10 min.  Divide dough into two large or four small portions.  Divide each portion into three pieces and roll into large ropes.  Braid three together, sealing ends.  Take braided rope and fold under itself, creating a "nest".  Insert 1 (for small) or 3 (for large) breads into center of each bread nest.  Let rise for 1 hour.  Brush with egg wash and bake at 350 degrees for 20 - 25 min until golden brown.